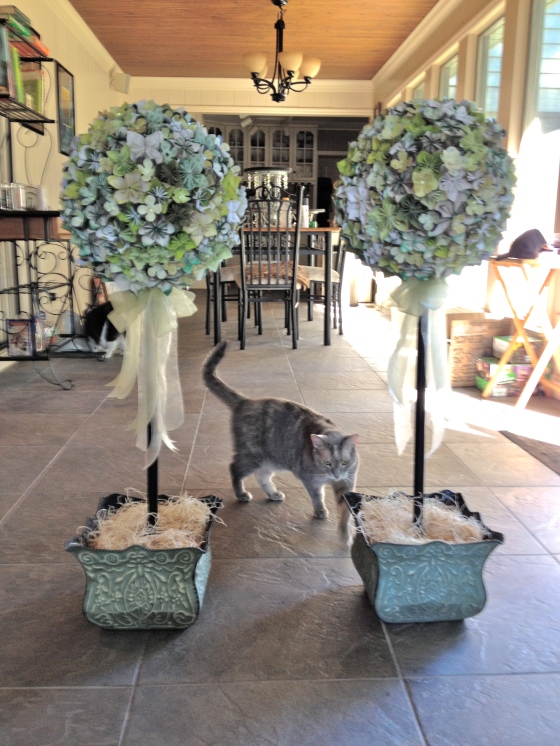
So there I was, happily folding Kusudama flowers for cocktail hour centerpieces, boutonnieres, etc., and thought I should make a topiary of these. I wanted some more decor around our dessert/candy/ice cream bar, but also wanted to block off the tables, nicely, so guests wouldn’t indulge before the cake cutting.
After days upon days of folding these flowers, I began calling this the WTHWIT? project–as in–What The Hell Was I Thinking? This took hundreds of flowers, each flower takes 5 petal folds –Well, you can do the math.
But, I really love how they turned out!
So if you have lots of time to sit and fold (and fold, and fold)–like several seasons of Breaking Bad or Mad Men, this is the project for you!
What You’ll Need:
Paper–lots. I used 12″x12″ because it easily cuts into 3″ & 4″ squares to make the Kusudama flowers.
Styrofoam ball, 2″-5″ smaller than the desired finished size of your topiary ball
4″ wood skewers-100s of these (check the BBQ section of your supermarket)
Half inch or larger wood dowel or pvc pipe cut to 5″ inches shorter than desired finished height of your topiary
Pot(s) or container(s) for the base & method for hold dowel/pipe in place (e.g, packed sand/dirt, plaster of paris, cement, styrofoam)
Low temp glue gun & lots of glue sticks
Cost:
About $25 for both topiaries, with parts left over.
I spent about $10 on the nicer papers (12×12 sheets); I had the pvc pipe, but dowels cost about $.75 each; Plaster of Paris is about $10 for a large bag (which is more than you’ll need for 2 topiaries)-or use free dirt; the skewers were $.19 for a bag of 100; the 8″ styrofoam ball was the most expensive item at $8 retail, but I used a 1/2 off coupon for them; ribbon $2 for a spool of organza green 1.5″.
Step 1:
Cut your paper into 3″ and 4″ squares. If you are doing a smaller topiary, you’ll probably want smaller flowers. This is a design decision.
Get very comfortable. Fold, fold, and fold some more. For a tutorial on how to make these Kusudama origami flowers, check out this tutorial.
I used approximately 200 flowers per topiary to get the 12″ diameter I wanted. Smaller topiaries will require less flowers.
Step 2:
Skewer your flowers. Insert the pointy end through the top of your flower then pull through so there is about 1″ of the skewer left inside the flower (see the pics below). Secure with a drop of hot glue on the base.
Step 3:
After you have many flowers made and skewered, start sticking. The skewer on the end of the flower will increase the overall diameter of your finished topiary. Now if you are like me and got sticker shock and the price of larger styrofoam balls ($20 for a 12″ –are you kidding me???), the skewer method is a much more economical choice. Plus, it allows for re-poking and fine adjustments, as opposed to directly glueing onto the ball.
Get the flowers as close together as you can and try to avoid large gaps. I ended up adding some smaller flowers from a punch to fill in as well. But this is optional.
I did find it quite helpful to first attach the dowel/pvc pipe to the styrofoam ball before I started adding the flowers so it would give me something to hold onto.
Step 4:
Secure it all together. Add some styrofoam glue (or low temp hot glue) to your dowel and re-attach to the styrofoam ball. Then attach the other end to the base inside your container. I used plaster of paris in old plastic flower pots because I wanted a nice heavy, secure base. But for smaller topiaries, styrofoam will work too. You can even use packed garden dirt and/or sand.
Just make sure everything is stable, non-wobbly and can withstand a cat rubbing up against it (ha ha).
Step 5:
Finish it off. I put my ugly plastic containers inside these nicer metal ones (which is great -I can change them out if desired), some raffia or petals to cover up the base top, and perhaps a nice bow on where the styrofoam ball meets the dowel.
I’ll be stringing a ribbon between these two as a way to “rope off” the dessert table with a nice “wait for it” sign.
It may be a while before I fold anything more….


Pingback: Origami Pomanders | Crafty Wedding
Looks very nice. What is the finished size of the ball ,how high is the whole topiary and also what is the size of your pots? I like the dimensions of yours
The finished size of the ball is 12.5″ and it sits 40″ tall. The pvc pipe is plastered into a 8″ plastic pot which I then set into these larger 10″ square pots. That way, I can change them into another pot if needed.
Thank you for your comment and interest.
Hi this is stunning!
This may be a daft question but I’m familiar with kusudama flowers but what are the smaller open flowers you have used along side?
I’m a novice but desperately want something like this for my wedding!
Thanks!
I just used a flower paper punch for those. They are held onto the skewer sticks with a dot of glue. The smaller flowers helped fill in the gaps (and saved some time since they are much faster to make).
Absolutely beautiful!! I’m sure they required a great deal of patience! Very nice touch!
Thank you. They are holding up very well too.
Beautiful , amazing project. Thank you
Thank you!
Pingback: 60 DIY Decorate with Paper | Rilane - We Aspire to Inspire
Where did you get the metal basket things
They are 14″ metal flower pots. I purchased them at Lowes or Michaels (sorry can’t remember exactly).
where do you purchase your 12×12 paper for your flowers? we’re doing entirely kusudama flowers and the paper is going to eat my budget
I try to purchase as much in stack packs (like for scrapbooking) but also buy per sheet. Usually just at a craft store such as Michaels/JoAnns when they have a sale. It has a good weight, and you only need the design/color on one side for the kusudama flowers and cranes.
Pingback: Topaz ties the knot - Origami flowers
I noticed that some of the flowers look like they have airbrushed edges. Did you do that yourself, or was the paper already designed that way?
The paper was just plain white. I paint up to & over the edge. You can probably see the over paint on the piece of cardboard I use to paint on.
How many flowers did you make (of the origami type) for each flower stand? They are stunningly beautiful. And how many of the plain paper punch type? I am (gulp!) considering this for my good friend’s wedding next year (gives me time to pull it off). Thanks for being such an inspiration, btw!
Oops! You already said 200 flowers per topiary (holy toledo!) in your description! Thanks so much!
Did you use sticky strips to adhere the petals together? Or Elmer’s Glue (as shown in the very helpful video link you provided)? Or Glue Dots? Or did you use the glue gun for that particular task?
I used a craft glue stick (extra strength) to glue the petals together when making the flowers. I used hot glue when attaching the flowers to the skewer. It has been over a year and the topiary has held together great. Not a flower or petal lost. Let me know if you have any more questions. I’ miso happy you like it and are doing one yourself. Post a pic when it is done –I would love to see it!
I am trying the Tombow Aqua Mono Liquid Glue to put the petals together. I have never tried this glue before. What craft glue stick brand did you use? (I’m a little nervous I may be using something that won’t hold up but it seems pretty sturdy, so far. Four down…396 to go….)
The Tombow is a better glue than I used. I don’t recall the brand, but it was not the kids type of glue stick. It said extra strength craft on the label. It bonded instantly, which I liked. A good quality double sided tape (e.g., glue dots) will also work well.
Pingback: 50 Decoraciones que puedes hacer casi gratis con papel – Marcianos.com
Pingback: 50 Extraordinary Beautiful DIY Paper Decoration Ideas | Home Design
Pingback: 50 Extraordinary Beautiful DIY Paper Decoration Ideas – My Blog
Pingback: craftywedding.wor... - Scarlett Home